Category Archives: Cookbooks, Magazines (+recipes from)

Momofuko Bo Ssam and Au Revoir Andy Hoffman

Bo Ssam 1

This is the story of pork butt.  It is also the story of friends (Jenn and Andy) who are moving to place of “the fountain”,  Geneva actually.  Certainly known for things other than “the fountain” but Google Geneva and the Jet d’Eau is all over the Image pages (followed closely by the flower clock).  Don’t ever try to say the words “Jet d’Eau” out loud if you do not speak French, it’s just embarrassing, trust me…

The pork butt portion of the story is sweet and savoury, the friends moving part is more bitter and sweet— though we want to have pals to visit in Geneva (and to tour the fountain with) we also are very sad to have them so far away (they eased us in un-gently by moving to Vancouver first).  We like to get together to eat with Andy and Jenn, a lot of meat, a lot of cheese and a lot of wine.  (Andy could throw around wine terms like “flabby” and “grippy tannins” before Sideways had people hating Merlot.)  Jenn makes mean guacamole.  And cocktails.  (Jenn’s cocktails are so good she should be an anesthesiologist.)

All I have left...and btw..the cayenne one is now gone.

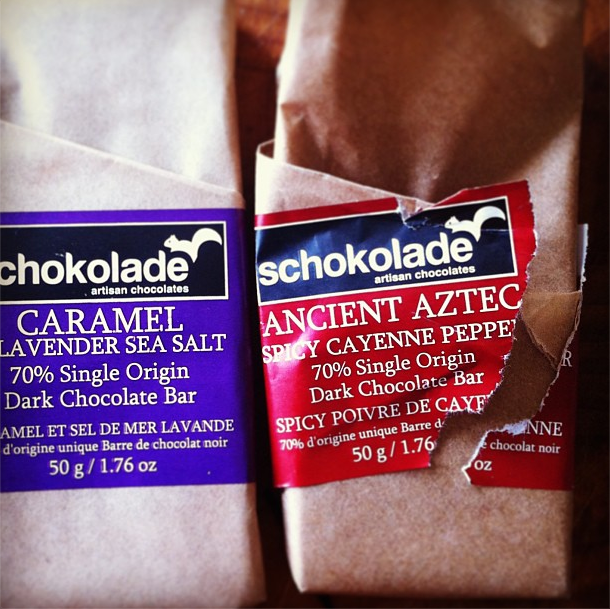
All I have left…and btw..the cayenne one is now gone after the photoshoot.

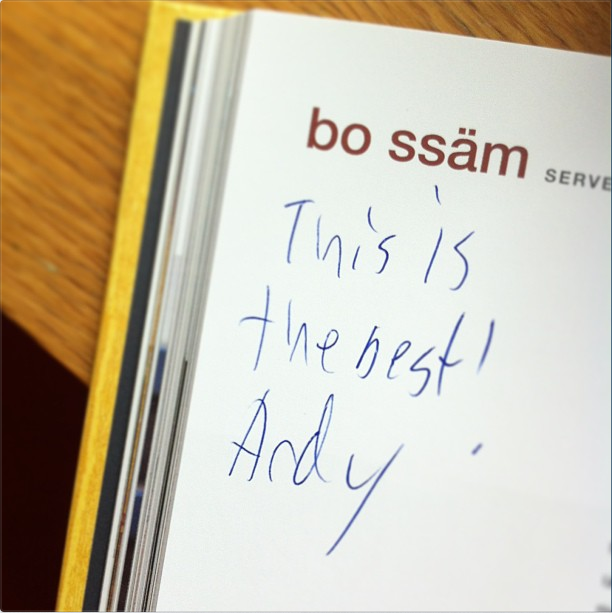
But this blog is sparked by Andy (not that we do not love Jenn-we do–and she brings chocolate from BC–which I am running short of and desperate for…) because when I last saw him he had his arm twisted into giving me the Momofuko cookbook for my birthday.  He came over to visit and had the book in a bag and then I might have said something like “Is that for me?” and then suddenly it was.  Which I feel bad about…but not a lot.

Cook book momofuko

Especially now that I finally made the Bo Ssam that every blogger every has already posted about, the book is on my “featured” bookshelf (also because it is great reading).   The Bo Ssam recipe came to me at the perfect time as we were having a BBQ (planned for a weekend of torrential downpour–so trying to feature meat but not on the grill) and aside from having delicious, easy food, I wanted to do something fun.  I haven’t had a “cooking day” in a while, and hurriedly making dinner for the family does not count ever.  (Almost ever.)   So meat that would be in the oven for hours, making the house smell inviting with it’s with potentially fantastic results seemed like a great idea… Andy said it would be the best.

Andy

And so I called Cumbrae’s and ordered 14 pds of bone-in pork butt (which the woman helping me seemed to think was a lot for 12 people) but I feared would barely be enough (no need to trust the experts Sue!).  To be fair to my own gluttonous judgement, I really was not sure how many people would show up and how can a person have a BBQ and bear the thought of running low on meat???

Screen Shot 2013-06-26 at 9.41.32 AM

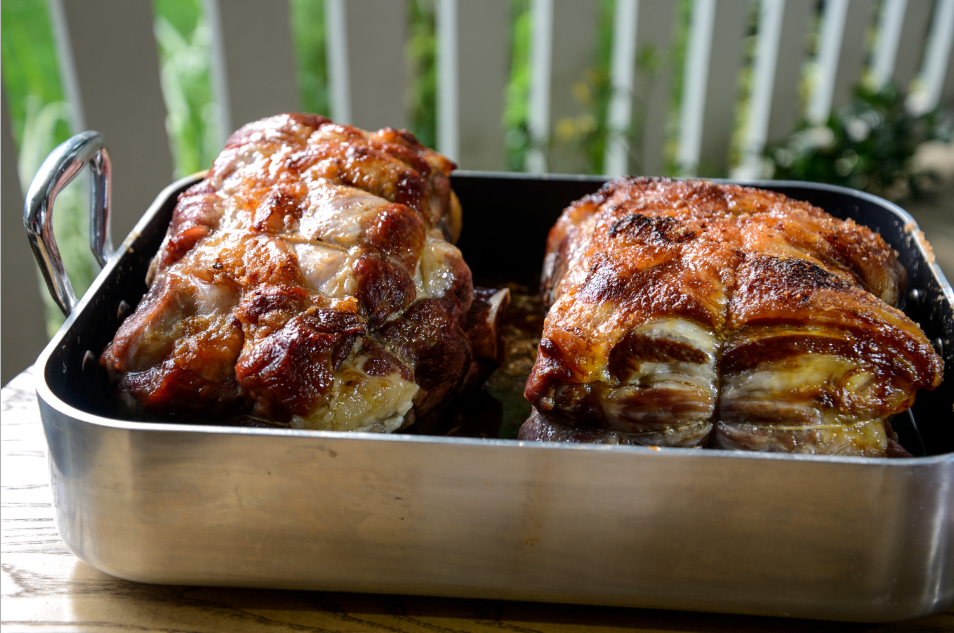
Fourteen pounds of pork butt

Essentially you’re just slow cooking the butt, so this recipe is incredibly simple.  The night before you rub the meat with a mixture of salt and sugar and let it cure overnight in the fridge.  Then you drain off any liquid and cook for 6 hours-ish at 300 F til tender and yielding.  I think ours went 7 hours.

Screen Shot 2013-06-26 at 9.41.14 AM

At that point, when you’re drooling and ready to eat you rub the exterior with a bit of salt and a lot of brown sugar, and fire the oven up to 500° F.  Then in goes the meat for about 10 minutes until the exterior is sweet and crusty (David Chang calls it a “pig shoulder encrusted in Pig Candy”  in the book).

Screen Shot 2013-06-24 at 10.52.50 PM

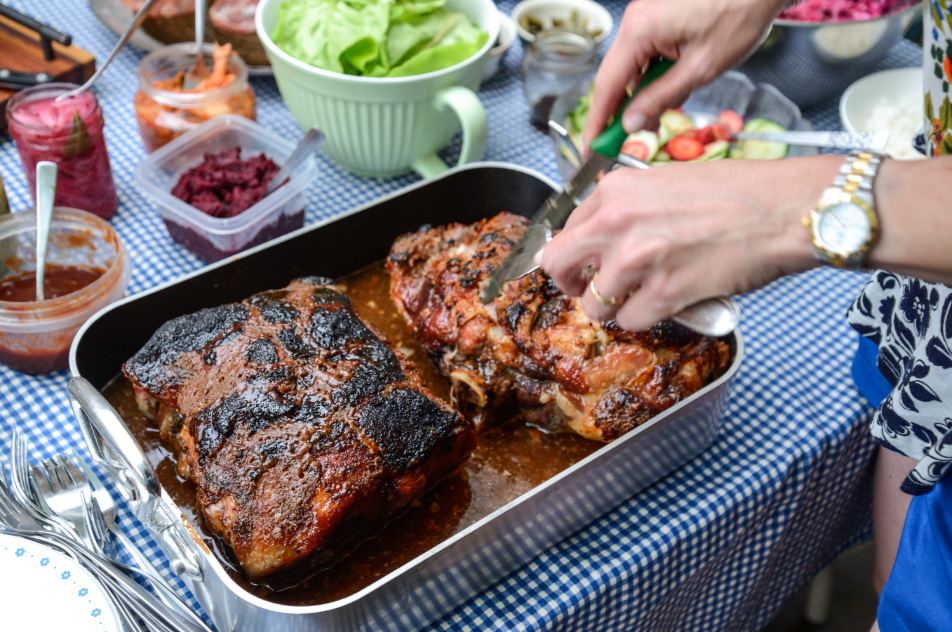
Finally you bring it outside (under the tarp your husband spent 3 hours putting up for a storm that would pass before the guests arrived) and you hesitate…..where to start?  All the guests, expected to eat at least 1 pd of eat each, hovered.  We also had an emergency as the steamed rice I had picked up from the Chinese food place was actually discovered to be fried rice.  Which was not going to work with my lettuce wrap plan.  (luckily the problem, a bike ride away was resolved though I admit I may have panicked and slightly overreacted when I saw the fried rice–possibly freaked out just a little?)

Screen Shot 2013-06-24 at 10.53.26 PM

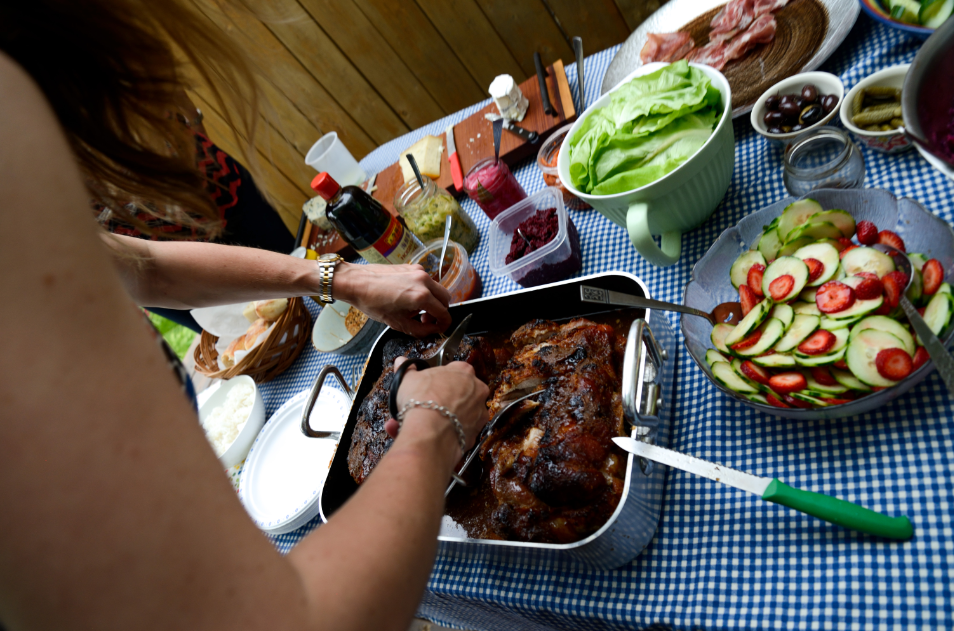
Finally, crisis managed, I dug in (we had Boston lettuce for wraps, steamed rice, condiments and cucumber and strawberry salad and red cabbage salad to go with–(the  recipe for the slaw is one  I was seduced by in California (red cabbage is very sexy) made by my brother and sister-in-law’s friend Traci.  Recipe at bottom.  AWESOME.).

Screen Shot 2013-06-26 at 9.41.51 AM

Condiment wise I made the ginger-scallion sauce reco’d in the Momofuko book, we had Kimchi, pickled onions and a beet horseradish spread I had made for burgers and was nice and earthy with some bite.

Screen Shot 2013-06-26 at 9.42.06 AM

This is not Andy (Andy who sparked the whole idea was back in BC planning what to wear to his first fountain visit), it is my friend Terry (meat consultant), and yes my face melted when I realized we had the wrong rice.  It was horrifying.  Luckily Terry took it in stride and just kept pulling meat.

Screen Shot 2013-06-24 at 10.53.36 PM


You must all try this.  Here is a link to Sam Sifton’s piece in the New York Times Magazine that provides the recipe.

Andy and Jenn-  wish you were here (but Geneva also good)  xo Sue

Red Cabbage Salad (based on a the slaw recipe from a The Northwoods in southern California.)

  • 1/2 head red cabbage
  • 1/4 cup vegetable oil
  • 1/2 cup plus 2 Tbsp red wine vinegar
  • 3 Tbsp sugar
  • 2 tsp salt
  • 1 tsp Lawry’s Seasoned Salt
  • 1/4 tsp black pepper
  • 3/4 tsp onion powder
Shred half of the cabbage finely and the other half coarsely. Place in a large bowl.
Whisk together vegetable oil, red win vinegar , sugar, salt, seasoned salt, black pepper, and onion powder.
Toss the dressing with the cabbage. Scrape the salad with the dressing into a zip-top bag or covered container and refrigerate. Let marinate for a 5  hours until cabbage turns deep red, softens a bit, and flavors meld. It’s even better after a few days.   (IT REALLY REALLY IS!)
AND THE CHEESE BOARD–I almost forgot– we had Albert’s Leap ripened goat cheese (ON), Bleu D’Elizabeth (QC) and Mountain Oak Wild Nettle Gouda (ON)
 

Leave a comment

Filed under All Recipes, Cookbooks, Magazines (+recipes from), Uncategorized

Hot and Sour Soup: The cure for what ails you (like that dumb flu)

MMMM MMMM, hot, sour and just right.

MMMM MMMM, Hot, Sour and just right.

It finally hit me.  The flu–yes that one.  Where you think you might be able to get out of bed while lying very still (in bed) but then put two feet on the floor, feel dizzy and realize, “nope, not getting out”.  I drank a lot of tea with lemon and nibbled buttered toast and then pulled out the big guns.  Hot and Sour Soup.  A step beyond comfy chicken soup, like the Buckley’s of cough syrup–except it tastes great.  And it works.

PIC 4 broth hot and sour

Broth for the Hot and Sour Soup–involves chicken stock, white wine vinegar and cayenne

I’d discovered the recipe in October issue of Saveur, “150 Classic Recipes” which I have a subscription for on my iPad.  The whole issue is amazing and inspiring and mouth-watering but I had never made Hot and Sour Soup and what a great skill to have I though!  The recipe is from the December 2005 issue and the little blurb I missed the first time around explained that, “Other cultures soothe their sick with bland milk toast and chicken broth but the Chinese kick their sick in the pants.  This soup doesn’t just warm you, it burns through you and brings you back to life.”- Mei Chin

Back to Life is just what this self-diagnosing patient needed.

PIC 3 marinating pork

So I began with marinating the pork.  Cut 4 oz pork tenderloin in 1/4″ cubes and toss with 1 tbsp soy sauce, 1 tbsp brandy and 1 tsp corn starch. I didn’t have brandy so used Madeira.  Let it sit 15 minutes at room temperature.

Meanwhile make the broth-in a large pot whisk together 8 cups chicken stock, 3 tbsp soy sauce, 3 tbsp white wine vinegar, 3 tbsp corn starch, 1 tsp ground white pepper, 1 tsp kosher salt and 1/2 tsp cayenne.  (I used a pinch of red pepper flakes).  Bring that to a boil over medium-high and add the pork.  Reduce the heat to medium low and cook until the soup thickens–about 30 minutes.  Give it an occasional stir.

PIC 5 Hot and sour soup tofu

Meanwhile you can cut 12 oz of firm tofu (drain and press lightly) into 1/4″ cubes.  Do the same with a potato to get about 1/4 cup cubed.

Pic 6 Hot and sour soup shiitakes

Take 6 shiitake mushrooms and cut them into thin strips.

Now add your tofu, potato and mushrooms to the pot once the soup is thickened and cook until the potatoes are tender.

PIC 7 egg

Now for the best part of the job!  Lightly beat 1 egg in a bowl and drizzle it into the simmering soup in a thin steady stream–egg strands will start to float to the surface and you will feel that YES, you see it all coming together.  Now stir in 1 tsp toasted sesame oil.

**I add about a teaspoon of Mirin at the very end, just rounds out the flavour for me with a hint of sweetness.

PIC 2 FInal Hot and Sour Soup

Ladle into a bowl and garnish with cilantro.  Eat in bed for lunch and again for dinner.  And of course, you should not be making this yourself, you are far too weak.  Your spouse, partner, mailman or cat is more than capable of following these simple directions.

For the recipe on-line at Saveur click on HOT AND SOUR SOUP RECIPE.

11 Comments

Filed under All Recipes, Cookbooks, Magazines (+recipes from)

My Ottolenghi Obsession, Jerusalem and The Boss

On October 21 I saw Bruce Springsteen….. (Because the Night  video from that show)

Yotam Ottolenghi and Sami Tamimi  (picture from the Ottolenghi site)

..and also attended The Cookbook Store’s event featuring Yotam Ottolenghi and Sami Tamimi who were introducing their latest book, Jerusalem. The recipes all come from their shard home city, where they were born in the same year, Sami on the Arab east side and Yotam in the Jewish west.

I honestly don’t know which I was more excited about.  (I did not wear plaid to the cookbook event but I did wear plaid to the concert.  No bandana, I swear.)

If you read Cheese and Toast occasionally you may know that I am obsessed with their vegetarian cookbook Plenty.  Why?  Because the recipes look amazing, taste amazing and they always work.  Really.  I do have a bit of a track record of experimenting with new dishes for dinners I’m hosting.  Like clockwork, 45 minutes before guests arrive, unwashed hair and pajama pants on, I’m panicking in the kitchen with dramatic wails of “just call Pizza Pizza, it’s going to be a disaster!”

But to be honest, that was years ago before I figured out the folly of my ways.  So much better to make a simple roast chicken and caesar salad, be mellow and enjoy a glass of wine rather than clutching the Chianti bottle, face pressed against oven door hoping the souffle will rise.  This does not tend to set a relaxed tone for guests.

All of this to say, that I would make any recipe from the Ottolenghi series of cookbooks for the first time even for The Boss himself.  They’re foolproof in my experience.

For this reason, I was really interested to hear Yotam and Sami talk about their testing and recipe writing process surrounding their third book, Jerusalem.

Did I mention they were warm and charming?  Utterly even. I do not think anyone there would have disagreed.

ON TESTING RECIPES:

Sami and Yotam explained that their goal when writing the recipes was to “not think like chefs”.  They put a lot of effort into testing and their testers were home cooks.  The Jerusalem cookbook uses quite a few ingredients that might be tricky to find in a pinch  (But as they joked, “once you Ottolenghize your cupboard, you’re OK”) so they list substitutions 90 percent of the time for more difficult to find items.  And though they obviously take great care with combining ingredients and flavours it was a bit of a relief to hear “if you miss one ingredient, you’re OK”.

(this was an interesting contrast to the Thomas Keller event (for the Bouchon Bakery cookbook) where though all the recipes are carefully tested til perfect, Chef Keller said he doesn’t really aim for the “home cook” because he can’t define the term.  He knows home cooks that can barely boil water and some that are as good as himself…and then I am sure he winked right at ME in the 18th row. Oh stop.)

(from top) Cannelini Bean and Lamb soup, Hot Yogurt and Barley soup and Chickpea Soup with rosewater and ras el hanout (from Jerusalem)

ON FLAVOUR

They’re definitely not shy on flavour, referring to themselves as strong and gutsy with the belief that the food should taste as vibrant as it looks.

FAVOURITE DISHES

Sami confessed to eating store-bought tortelleni with Parmesan and pepper when lazy (what a relief!), Yotam said his most comforting food was lentils and rice with some yogurt and caramelized onion.

One of the beautiful market images from the book.

HOW THEY CHOSE THE RECIPES

They both agreed that though they tested and made many more recipes that were included in the final version of Jerusalem, they only put in anything they truly, truly loved and dropped anything else.   They also talked about the photo shoot for the book (as you can see from the soup pic the photos are stunning) explaining that they did not use a food stylist, preferring to have the food presented “as it fell on the plate” without too much intervention.   So they actually shot about 8-10 photos a day (which is apparently unheard of).

Spice Trader

WHERE TO GET INGREDIENTS

In Toronto helpful audience members recommended Spice Trader (877 Queen Street West) and Arz Fine Foods (1909 Lawrence Avenue East).  Both are worth a trip whether you need anything or not, so it will be a fun and delicious mission.

You can also order online at the Ottolenghi website to buy ingredients such as Palestinian za’atar.

As if I wouldn’t show off the signed book!

If you want to try a couple of recipes before purchasing this book, I’ve blogged about a few from PLENTY such as the vibrant Sweet Winter Slaw, Socca with Roasted tomato and onion and the Celeriac and Lentil Salad with Hazelnuts and Mint.

The Lentil Celeriac Salad..

Or just get the damn books.  Best excuse to visit The Cookbook Store three times in a row.

6 Comments

Filed under Cookbooks, Magazines (+recipes from), Travel and Food, Uncategorized

Homemade Fruit Roll-Ups: Bring ’em to yoga and feel virtuous (but also humble)

How awesome are these blueberry fruit rolls? Made by ME–at home!

There are some foods (?) like gummi bears and M&Ms that one cannot imagine as “home-made”.  The Fruit Roll Ups of my youth were one such item.  Weren’t they meant to come in a colourful cardboard box and in crazy colours like bright blue?   Sure, there were the natural “fruit leathers” out there but we never had those in my house.

I realize there are a million recipes for fruit rolls on the internet but I never paid attention until I watched one of the recent Dessert Basic videos on the Globe and Mail site.  It looked so easy.  I had to attempt it.  I will tell you upfront that I failed and I succeeded, there were highs and there were lows….so perhaps the lessons in my fruit roll journey will help you in yours.

In the video, Pastry chef Yasmin Johaadien uses raspberries but says that you can use almost any fruit (there are exceptions which she mentions at the end of her instructions). I decided to do a blue berry batch as well.

blueberries

The first step is to start with three cups raspberries (and I assumed 3 cups of any fruit you are using, I used three cups blueberries as well).

Once you’ve liquified the berries you strain them through a sieve.

Easy peasy so far, right?  I did the same thing with the blueberries.

The raspberry puree, once strained, came to 1 cup final product and the blueberries yielded 1 1/2 cups.  Seems that this can vary per batch, Yasmin was working with a 1 1/2 cup yield for her raspberries.

I put both purees in pots on the stove, added 1 tablespoon lemon juice to each and then reduced them by half.  Now I’ve never been very good at assessing when something has reduced by half so I actually measured the raspberry puree at one point and still had to reduce further.  The blueberry thickened up faster even though there was more puree.

Once reduced you add a 1/2 cup sugar to the puree and stir until just dissolved.

Then I poured both purees onto (individual) parchment-lined sheets and spread them with my off-set.   The raspberry was less viscous than the blueberry.

Then I put them into the oven at 225°F for 3 hours (Yasmin says to you’ll need about 2.5-3 hours in the video).  When I took them out they were (as instructed) sticky to the touch but did not seem to cling to the back of a spoon.  The point being that you need some moisture in them or they will dry and crack (not roll).  I allowed them to cool.  And then instead of using a knife or pizza cuter to portion them, I just cut them with scissors.

And then PRESTO I peeled away the parchment!

Laying them on new parchment, I rolled them individually.

And I had a whole batch of my very own roll ups!

And now for the sad finale of the raspberry misadventure….

The above crsipy bacon-like rolls were a result of me putting the raspberry strips back in the oven because they would not peel off the parchment, and they were still too sticky and tearing, even after cooling.  I think I should have reduced the puree more at the beginning and I also think that putting them back in the oven might have worked but I left them too long.  And they dried up.  DO NOT OVER DRY THEM.

But no one needs to know about those.  I’ll just give them another whirl (and report back).  Or stick with the blueberry.  Everyone needs a signature “roll up”.

Has anyone made these before?  Any tips are welcome!  I think I might blend the berries next time.  And we really did take them to Felix’s yoga for kids class.  I rocked the hippie mom vibe.

6 Comments

Filed under All Recipes, Cookbooks, Magazines (+recipes from), Uncategorized

How to Smoke Cheese on Your BBQ (and win friends and influence people)

Cheddar, Mozzarella and Pecorino– all warm and smokey.

Where’s there’s smoke there’s a woman who smells like a campfire.  That woman was me as I tried smoking cheese for the first time this past June.  Armed with a 30W smoldering iron, a tin can, hardwood chips and my Weber I was ready to MacGyver it up.  The Spread article about the experience will also tell you everything you need to know.  (Including how I struggled through a hurricane-like storm to achieve my lofty goal…..a smoked cheese burger).  But it did not include pictures of how this simple technique will make you look like a culinary superstar.

So here, with visuals, is the step by step.

STEP 1: Remove the label from your can. Now open the top with a can-opener about 2/3 of the way around. Bend back the lid and remove the contents (save for later). Rinse out the can.

STEP 2: Using a triangular can opener, make a hole in the centre of the opened lid of the can (where it’s still attached). It can be hard to get the right leverage so I put a pen under the open part of the lid to prop it up. Make a hole (vent) in the bottom, too.

STEP 3: Fill the can with wood chips. Fruit wood is a good choice because it gives a sweeter, milder note (mesquite chips can be overpowering for cheese).  Home Hardware has them.

Yes, this is the uncleaned bottom of my Kettle BBQ.

STEP 4: Insert the soldering iron all the way into the triangular hole in the top, where the lid is hinged. (I had to make the hole bigger.) Place the can with the soldering iron at the bottom of your grill (where the coals or flame would usually be). You want the iron lying on the bottom of the grill – so the chips in the can fall on top of it. Replace the top grate, close the lid. Plug in the soldering iron (you may need an extension cord). Its heat will cause the chips to smoulder but not catch fire. The barbecue should be filling with smoke in about 15 minutes.

STEP 5: I smoked cheese on my Kettle grill (above) and on our gas BBQ and it worked perfectly both ways.  Lay a piece on foil on the grill and lay your cheese on top. Close the grill.

I used three cheeses: Balderson 3-year-old cheddar, Pecorino Romano and half a ball of mozzarella (regular, not fresh). Check after 30 minutes to gauge how much smoke flavour you like; bigger hunks of cheese will take longer.   Flip the cheese half-way through the smoking to expose all the surfaces.

There they are on the gas BBQ. Happy as can be.

STEP 6: Remove the cheese and let it come to room temperature. If moisture has beaded up on the surface, dab it with paper towel. Wrap the cheese and refrigerate overnight (or at least a few hours) to let the flavours settle. The cheese will be slightly golden but not intensely dark.

After a bit of troubleshooting, the results were amazing. The cheddar was flavoured with the sweet, fruity smoke (I will be melting it on nachos). The Pecorino was also satisfying – the smoke was a nice match to the sweet/salty notes of the cheese. The mozzarella, which had a denser exterior, took on the mildest flavour, but would add perfect, subtle smoky notes to a pizza.

TIPS WHEN BUYING YOUR SOLDERING IRON:

Use a soldering iron with a cord. I bought a cordless version that stayed on only while your finger was pressing the button – back to the store for me. No amount of duct tape would make it stay down.  Honest.

Also, even if you have a soldering iron, you want to buy a new, clean one to use with the food.   THE SOURCE has them.

3 Comments

Filed under All Recipes, Cheese/Cheese Related, Cookbooks, Magazines (+recipes from), Uncategorized

The Grate Canadian Grilled Cheese Cook-Off (and grilled cheese giveaway-thanks Cheesewerks!)

THE WINNER: Niagara Gold Crunch Grilled Cheese by Chef Jason Bangerter

Remember that Bryan Adams song?  “Everything I do I do it for a Niagara Gold Crunch Grilled Cheese?”  A real wedding fave.

First off–yes–there is a grilled cheese give-a-way at the bottom of this post.  Second the Niagara Gold Crunch grilled cheese was unbelievable.

I spent this afternoon as a judge at The Dairy Farmer’s of Canada Grilled Cheese Cook-Off.  (I know, does lunch get any better?)  Four of Canada’s top chefs went head to head and each served two grilled cheese sandwiches made with cheese made from 100% milk  (you’ve probably seen the little blue cow label on your cheese, it means that a cheese is made with all cow’s milk, no other additives–aside from salt and culture of course.)

Just wanted to give you a little brief of the menu and the chefs, so I’ll start with Chef Bangerter and move on from there.

Executive Chef Jason Bangerter of O&B ( Luma and Canteen), Toronto

CHEF JASON BANGERTER

Niagara Gold Crunch (The Winner)
Niagara Gold cheese, sour dough bread, prosciutto, baby arugula,  with the bread brushed with mayo that had been flavoured with garlic, thyme and pepper before being grilled.

*this was also served with pickled grapes and a sparkling fresh grape juice that was the perfect compliment to the savoury sandwich.  I hear it will be going on the menu…..  (but here is the RECIPE if you want to DIY it)

Sweet Summer Night

This was the Chef’s dessert grilled cheese. It was made with mascarpone cheese and fresh berries with a some basil added in between the grilled brioche. It was served with aged balsamic vinegar.

Executive Chef Michael Howell, Tempest Restaurant, Nova Scotia (defending champion)

CHEF MICHAEL HOWELL

Crabby Dipper

Yum, if you love crab dip, this is your man-wich from Chef Howell. The crab dip is made with cream cheese, marinated artichokes, fresh parsley and some hot sauce.  There as also a hint of smokiness from smoked Gouda and real crabmeat–of course.  Recipe here.

The Crabby Dipper

Apulia Panini

This was inspired by Chef Howell’s love of  Southern Italy (he gives culinary tours of Italy, just FYI!) this sandwich was on olive bread and had Asiago cheese, pesto, tapenade and sundried tomato compote inside. All homemade of course and incredibly flavourful.

Chef Liana Robberecht, Calgary Petroleum Club holding her Stampede Centennial

CHEF LIANA ROBBERECHT

Stampede Centennial

Chef Robberecht made this grilled ‘wich with pulled beef short ribs, provolone and blue cheese on sourdough–oh–and a bit of onion jam for some tangy sweetness. Must be eaten with fork and knife.  (Or just a pile of napkins on hand).

Cherry Bomb Grilled Cheese

The Cherry Bomb

This baby came close second for me.  It looked gorgeous on the plate (excuse my shoddy photo). The bright red, candied cherry tomatoes were bursting with flavour and gave the sandwich such a freshness married with Triple Cream Brie and then crunchy bacon (ok, my mouth started watering as I wrote that).  Trust me, you want the recipe for for the candied-tomato vinaigrette.

Executive Chef Ned Bell, Yew Restaurant, Four Seasons Hotel, Vancouver

CHEF NED BELL

The Simple

This was a great concept, because the comfy, cozy grilled cheese we all want on a rainy day is just cheese melted and in this case served with a fruit chutney.  Showcased the bread and the cheese (Courtenay Cheddar and Island Brie).  And the presentation was, can I say, cute?  Would Chef Bell kill me?  I loved it.

The Ned “Bell Pepper” Sweet and Spicy

This little number was made on a country loaf with Hot Pepper Cheddar and Pacific Pepper Spicy Verdelait.   The red bell pepper jam on the side made it, I think you’ll be wanting this recipe too.

Judges Elizabeth Baird and Rita DeMontis (talking and tweeting about the event)

And who were my fellow judges?  Elizabeth Baird, Rita DeMontis and Kevin Durkee of Cheesewerks which brings us to our free grilled cheese!

Judge Kevin Durkee of Cheesewerks at Grilled Cheese Mission Control

HI EVERYONE–THE GRILLED CHEESE VOUCHERS ARE ALL SPOKEN FOR. Thanks for emailing, we’ll do another giveaway soon!

Kevin has generously donated a few sets of tickets for a free Original Grilled Cheese (so you can either bring someone or eat two sandwiches–it’s a toughie).

Cheesewerks (56 Bathurst St, Toronto) which also serves soups and mac and cheese, also offers some amazing sodas that are made in-house (and written up by Macleans magazine).

Email me at sueriedl@gmail.com with the words “Grilled Cheese” and I’ll give them away, first come first serve!

4 Comments

Filed under Blogs with cooking tips, Cheese/Cheese Related, Cookbooks, Magazines (+recipes from), Uncategorized

When the moon hits your eye like a no knead pizza pie….

No knead pizza dough was a revelation and a roaring success—say I, the only one eating the hot pizza yesterday afternoon at 1pm.  A lone witness to my own spectacular creation.

But it really was amazing, the crust was flavourful (the point of the 18 hour ferment) and chewy on the inside, but crisp on the exterior.  And I didn’t even use a pizza stone, mine cracked a while back and I have yet to replace it, but now I want to replace it ASAP.  So much pizza potential in my future!

For some background, here is a good piece on the no-knead recipe (with a video) created by Jim Lahey.   You must try this pizza dough at least once.  Throwing the dough together takes about 45 seconds (give or take a minute) and after an overnight ferment you can have pizza on the table way sooner than delivery can get to you.  Sooner than you can bake a frozen pizza in fact.  And waaaaaaaaaaay better.

If you can, try and use your scale for the measurements as it will be more accurate than cups/measuring spoons.  (Scales are not expensive, invest when you can, it will change your baking for the better.)

Ina  large bowl mix 500g AP flour (3 3/4 cups), 1 gram active dry yeast (1/4 tsp), 16 grams fine sea salt (2 tsp).  Now add 350g water (1 1/2 cups).

*make sure you have the right yeast–not instant and not pizza yeast.

Mix everything with a spatula til the dough comes together and then use your hands to pick up any excess flour with the still sticky parts of the dough.

I ended up with the above.  And then I threw a tea towel over it (or just use saran wrap) and let it sit in a warm part of the house for 18 hours.

And that part is done.  See?  Easy–I barely had enough instructions to go with the pictures.

18 hours later it should have doubled.  (Mine also kind of “splatted” a bit.  Made itself comfortable in the bowl. )  The “doubling” may go slower in a cooler room and faster in a warmer one.

Once doubled, I dumped the dough onto a well floured counter and using a serrated knife cut it into four pieces.  Then you take each piece individually and pull in the edges towards the center…

It doesn’t matter which corner you start with, just pull it forward like you’re folding a handkerchief….(we all still use handkerchiefs right?)

Until you have something like the above.  Then flip your dough over, seam on the bottom, and using your hands mold the dough into a neat ball.

And you will end up with something very satisfactory, like the above.  The dough will feel loose and silky in your hands, it is less stiff than other pizza dough recipes sometimes are.

Since I was not ready to make my pizza, I saran-wrapped my dough balls and put them in the fridge.  They can sit for up to three days.

You bring the dough out of the fridge a couple hours before you want to use it.  Just to get it to room temperature.  (Yes, I probably could have used a bigger plate.)   Also, my dough was a bit damp under the saran wrap, so I just dusted it with a bit of flour once out of the wrap.  Then covered with a tea towel and let warm up.

Let’s summarize: on your actual pizza making day all you have to 1. take dough out of the fridge and 2. form it into a pizza.

Also preheat the oven to 500°F.

The forming is the fun part.  Handle the dough very gently–you want some of the gas/bubbles to remain.  First stretch it lightly with your hands on the work surface to form a small disk.  Then you can pick it up and “pizza guy” style, use your knuckles to pull it out to about 10-12″.  You should also sing the East Side Mario’s theme song while you do this.

My pizzas were about 10″ average.  Before topping move your dough onto a pizza peel or the back of a baking sheet (to avoid the edges) before topping.  Dust the back of the dough well with flour.  (You do not want to try and lift your raw dough once it has toppings on it.  It will be disaster and you will then truly hate pizza making.)

I had some tomato sauce in the fridge, a ball of mozzarella and some prosciutto.  My pizza was born.

Ideally you have a pizza stone in the oven that is heating up and you can slide your pizza off the peel, or off the back of your cookie sheet, onto the stone which will instantly start crisping and cooking the dough.  I just put the pizza in oven on the same cold cookie sheet it started out on–and crossed my fingers.  Bake 6-7 minutes.

Success!  I added some sweet red onion and baby kale leaves and sliced.

Chewy, crispy and delicious.  There will be no crusts left behind when you make this dough.  They may even get eaten first.

(If you love this recipe, you may decide to love Jim Lahey and buy his pizza book My Pizza: The Easy No Knead Way to Make Pizza At Home)

14 Comments

Filed under All Recipes, Cookbooks, Magazines (+recipes from), Uncategorized

Art of the Danforth: Feast in the East (and no knead pizza dough)

If you’re already thinking about the weekend (yes, that started Tuesday I know) you might want to check out some of the Art of the Danforth activities.  On Saturday night is an event called Feast in the East which will combine music, art and culinary art.  There are three such events over the course of the festival.  Last week the theme was British/Scottish.  This Saturday, May 26 is Italian and (I am excited about this one) June 9 is Ethiopia.

Meanwhile I am going to finally try the no-knead pizza dough recipe by Jim Lahey, owner of the Sullivan Street Bakery.  It ferments overnight so I will let you know how it goes, but I find pizza is the perfect quick dinner for a Friday night.  Especially if I can whip together the dough today.  I have an easy, favourite recipe but this will apparently “exceed my wildest expectations”.  We shall see.

If you want to do this along with me (in fact, can you do this and I’ll come over and pick up half of the dough tomorrow) here is a link to the recipe from Bon Appetit.

Also, if you make this and then tomorrow on the drive home you’re like, “screw it, I’m ordering Thai” the dough can sit for three days.   A procrastinator’s dream.

Otherwise we can compare notes bright and early Saturday morning.  No, of course not, Saturday is for sleeping in until your spouse does not get up when your toddler is clearly making loud wake-up noises from his bedroom at 7am and someone needs to go get him….

5 Comments

Filed under All Recipes, Cookbooks, Magazines (+recipes from), Uncategorized

You ain’t seen nothin’ yet Coleslaw

It’s a little bit coleslaw, a little bit art. Maybe it’s for dinner tonight?  This recipe is the Sweet Winter Slaw from the cookbook I am obsessed with, Plenty, by Yotam Ottolenghi.  I made this for the first time in Omaha when visiting family and then again on Saturday to go with the Black Pepper Tofu (from the same book) which is irrationally loveable.  If I figure out where I saved the photos from that preparation I will post them soon too.

But this salad is not only easy (the chopping takes a bit of time but you can do it in advance) but the combo of papaya, mango, mint, cilantro and red cabbage (plus the candied macadamia nuts) is pretty stellar.  Your guest’s taste buds will be at your mercy–you can serve charred, dried out chicken breast right after and people will still walk away thinking you are a genius.

When we made this in Omaha we forgot to get macadamia nuts so we used pecans. The nuts are candied and then roughly chopped before being tossed in with the other ingredients.  You can use peanuts as well.

The smell of cilantro as you chop it will energize your work as you rush towards dinner hour ( especially if you’re like me and are always one side dish behind in prep because you’ve  decided to take extra time arranging the glasses on the dining room table “just so”.)

If you make this in advance, I think you can cut everything a few hours ahead except for the mint and cilantro.  If you add the herbs  an hour before serving (don’t toss yet, just add on top of the salad and put a damp paper towel on top of the ingredients) I think everything will still be fresh and fine.  Realistically, chopping the herbs does not take a lot of time–but you may be space crunched as I am though so anything done if advance helps.

The dressing can be made the day before.  You may want to steal this dressing and us it on other greens or salads.  Its addictive flavour comes from maple syrup, lime juice, lemon grass, sesame oil and chile flakes in it.

Finally just before serving, toss everything together, pour on the dressing and serve.  This will actually still taste pretty good the next day (if you have leftovers) though the herbs and nuts will be a bit moist by that time.  When I made it this weekend I reserved some of the salad without dressing for the next day, figuring I could always toss some more if we ran out.

And here it is going on the plate:

This image is from our Omaha dinner, we served it with this tomato and onion Socca.   In the book there’s  recommendation to serve this with roast chicken.  Perfection I think!

Sweet Winter Slaw  (adapted from Plenty, by Yotam Ottolenghi)

Serves 6

Dressing

6 1/2 tbsp fresh-squeezed lime juice (3-4 limes)

1 lemongrass stalk, chopped into small pieces  (you can substitute with zest of lemon)

3 tbsp maple syrup

2 tbsp toasted sesame oil

1 tsp soy sauce

1/4 tsp chile flakes

4 tbsp light olive oil/sunflower oil

Candied Nuts

1 1/4 cup macadamia nuts

2 tsp butter

2 tbsp sugar

1/2 tsp salt

1/2 tsp chile flakes

Slaw

7 inner leaves of Savoy Cabbage, finely shredded ( I used 1 quarter of a green cabbage, could not get savoy)

1/2 small red cabbage, finely shredded

1 ripe mango, cut into thin strips  (How to peel and slice a mango)

1 papaya, cut into strips

1 fresh red chile, seeded and finely sliced

1/4 cup mint, leaves roughly chopped

1 1/2 cups cilantro, leaves roughly chopped (How to Chop herbs)

Method

For the dressing: Place all the ingredients except the oil into a small saucepan and reduce over high heat for 5-10 minutes until syrupy and thick. Remove from heat and once cooled strain into a bowl and add the oil.  Set aside.

(* ok, I am laughing at how I did not read this instruction and just mixed this all as if making a regular vinaigrette (no heating in pan).  I think it will be better reduced but it still worked great!  So one more time–ALWAYS READ THE RECIPE ALL THE WAY THROUGH)

For the candied nuts:

Place the nuts in a medium pan over medium heat  and roast until lightly browned.  Watch these and shake the pan occasionally so they don’t burn.

Add the butter and when melted add the sugar, salt and chile flakes.  Stir constantly so the sugar doesn’t burn and when caramelized (the sugar will be melted and gooey) remove from the heat and pour onto parchment to cool.  Chop roughly once solid.  Set aside.

Assembly:

Put the cabbage and the rest of the salad ingredients into a bowl (including the nuts).  Add your dressing and toss.  Give it a taste to see if it needs anymore seasoning and serve it up!


6 Comments

Filed under All Recipes, Cookbooks, Magazines (+recipes from), Uncategorized

Weekend Fluff: Make Marshmallows

Just when you think, “what could be more fun than doing nothing on the weekend” along comes some food blogger to tell you to make marshmallows.  Yes, I know, you can buy  marshmallows at WalMart or the gas station but there is nothing like the satisfaction (and an odd comfort) of making these at home and realizing  you can replicate the texture and and lightness of the industrially manufactured confection from your childhood—but they taste way better.  (You can even delight in squashing these between your fingers and making “ghost gum” –anyone know what I’m talking about?)

These were rolled in coconut.

Homemade marshmallows are more beautiful and delicate than the packaged masses.  They also have real flavour since you can add fragrant vanilla beans (or puréed fruit) and drop in a subtle hint of food colouring to help match any baby shower, bridal shower, man-cave christening or home campfire you’re planning on hosting.

And making them successfully in your own kitchen provides the same kind of fun and slight MAGIC as  when you pop your own popcorn in a pot on the stove.

Plain vanilla bean batch.

I made these from a recipe in Chris Nuttall-Smith’s Man Vs Marshmallow piece in the Globe and Mail recently (which tells you about the origins of mallows and has a great tip about calibrating your candy thermometre).  Just imagine the thrill of  making sea-salt caramel marshmallows or a butter-rum version.  Which I have not yet done but plan on using to kick   bake sale ass at Felix’s school (rum makes the pre-schoolers feel like pirates, fun!!)

This stuff feels pretty cool. Opposite end of the spectrum of homemade playdough.

Yes, I am going to keep showing you pictures until I wear you down.  Believe me, I can keep going, this is the age of endless digital photography.

Finally then, here’s the recipe as adapted from  Marshmallow Madness! by Shauna Sever.   The book includes a tonne of amazing variations on the species–including the buttered rum variety mentioned above.  And BTW, this looks lengthy, but it’s not complicated, just detailed to make sure yours turn out perfect. Just dive in, you’ll be fine.  YOU MUST HAVE A STAND-MIXER FOR THIS RECIPE.

If you want some coaching, here’s the video version of How to Make Marshmallows.

I can fit 14 in my mouth at once, you?

Classic Vanilla Marshmallows

One important tip—don’t trust the measurements on the package of your powdered gelatin.  Measure the powder yourself with a teaspoon.

Have everything ready before you start as once the syrup reaches the right temperature you have to be ready with all the other ingredients in the mixer.

Ingredients

COATING

1 cup icing sugar

2/3 cup cornstarch

BLOOM

4 ½ teaspoons unflavoured powdered gelatin

½ cup cold water

MALLOW

¾ cup sugar

½ cup light corn syrup (divided)

¼ cup water

1/8 tsp salt

2 tsp pure vanilla extract

Method:

  1. Make the coating first.  You’ll have enough to use for a couple batches. Sift the icing sugar and cornstarch into a bowl and whisk together.  You want to eliminate any lumps. Set aside.
  2. Spray an 8” X 8” inch pan with no-stick spray. Set aside.
  3. Now bloom your gelatin.  Measure a 1/2 cup cold water into a small bowl and sprinkle the powdered gelatin on top.  Whisk it well and let sit for at least 5 minutes to soften.
  4. Meanwhile for the mallow mixture, measure the sugar, ¼ cup corn syrup, water and salt into a small saucepan.  Set over high heat and bring to a boil until it reaches 240 °F on a candy thermometer.  Stir occasionally.
  5. While the syrup is heating, pour the remaining ¼ cup corn syrup into the bowl of a stand mixer.  Microwave the gelatin for 30 seconds to ensure it’s fully melted and add that to the mixer bowl.  With the whisk attachment on set the mixer to low and keep it running.

TIP: Don’t forget to keep checking your syrup—make sure your thermometer doesn’t touch the bottom of the pan when testing the temperature.   And remember that boiling syrup is extremely hot so take care to keep it from splattering. 

  1. Once the temperature hits 240 °F slowly pour the sugar mixture into the mixing bowl.  Increase the speed to medium and beat 5 minutes.  Then increase speed to medium-high and beat another 5 minutes.  Finally, pause to add the vanilla and beat for 1-2 minutes on the highest speed until white and thickening.
  2. The marshmallow mixture will be very fluffy-about triple the volume and will now start to set very quickly.  Pour into the greased 8 x 8 dish and smooth with an offset or spatula.
  3. Sprinkle the top generously with the marshmallow coating and let the marshmallow set in a cool, dry place for 6 hours before cutting.
  4. Once set, run a knife around the edge of the dish and flip the mellow slab onto a surface dusted with the marshmallow coating.

10. Now just slice the marshmallows into cubes (or cut using scissors or cookie cutters sprayed with non-stick spray).

11. Toss them in the coating to cover all the sticky sides and serve.

12. Store in a dry cool place and just redust the marshmallows if they get a little moist.

VARIATION: You can also coat your marshmallows with finely ground nuts like pistachio, shredded coconut or graham crumbs.

COLOUR:  Drop in a bit of food colouring just before you beat the marshmallow for the final 2 minutes.

9 Comments

Filed under All Recipes, Cookbooks, Magazines (+recipes from), Uncategorized