Tag Archives: recipes

The Family Sweet Marie Bar recipe (you will love me so much)

Pic 1 Final

When I say “family” I don’t mean this is some sort of East European treat– this I claim as my own though it is truly a Seaborn classic.  I feel that I have eaten enough of them over 17 years to have some ownership.

We are going camping this weekend and I made a batch of these.  The step-by-step is posted her at the foodnetwork.ca blog but here’s the basic recipe.   Takes no time.  You must make it.  Trust me on this one.  (and also– just go with the corn syrup and margarine, don’t screw with perfection.)

SWEET MARIE BARS

makes about 20-25
Ingredients:
1/2 cup peanut butter
1/2 cup brown sugar
1/2 cup corn syrup
1 tbsp. butter or margarine
2 cups Rice Krispies
1 cup salted peanuts
1 package real chocolate chips

Directions:

  1. Heat peanut butter, sugar, corn syrup and butter over low heat until mixture starts to boil.
  2. Remove from heat and add Rice Krispies and peanuts. Mix well.
  3. Press into a greased 8- or 9-inch square pan.
  4. Cover with chocolate chips while hot. As chips melt (give it a couple minutes) spread over the top.
  5. Let cool until chocolate solidifies and cut into squares.  If the chocolate is a little soft it’s ok, but if cut when still melted you will have quite a mess on your hands! (my mother-in law pops the pan into the freezer for 10-15 minutes to speed up the process)

1 Comment

Filed under Uncategorized

Homemade Ricotta, Easier than Pie (guest post by Ally Chang)

PIC 2 ricotta

How did I get so lucky to have two of my talented friends blog recipes on Cheese and Toast this spring?  First Johanne Durocher made Saag Paneer and now my friend Ally Chang (another cheese obsessed cohort) will show you how to make homemade ricotta–it is SO GOOD–especially warm, and Ally  also added her ricotta pancake recipe.  How good is it to live at her house?  Enjoy,  SR.

How to make Ricotta Cheese      by Ally Chang

Making ricotta cheese is so incredibly easy and it tastes so much better than store-bought too.  I have modified a couple of recipes to make it even easier – I like recipes that call for things I have on hand, not specialty items that I have to buy.  So if you have milk, cream, salt and lemons you are in cheese making business.  We eat some of this warm, fresh ricotta in the morning for breakfast with fresh fruit.  I then use the rest to make Lemon Ricotta Pancakes the next day.  The pancake actually freeze well so the left-overs go into a Ziplock and into the freezer and I have a quick and easy breakfast option for my kids during the busy weekday mornings.

Screen Shot 2013-04-12 at 6.47.34 PM

If you do not have cheese cloth is available at most grocery stores or the bulk store.

Ricotta

Bring the following ingredients to a gentle simmer:

1 litre (4 cups) of 3.25% milk (I use organic but you can use non-organic)

1 1/2 cups whole (35%) cream

1 tsp salt

Then add:

2 tbsp fresh lemon juice

1 tbsp white vinegar

Screen Shot 2013-04-12 at 7.19.07 PM

Draining the ricotta through cheese cloth.

Let this cook for 1 minute and you will see the curds separate from the whey.

After 1 minute, drain the cheese through a cheese cloth (doubled) that has been placed in a colander.  Let it sit in the colander to further drain for a few minutes.

Screen Shot 2013-04-12 at 7.18.52 PM

Enjoy warm with fruit or let cool then store in a container in the fridge.  The next day you can make Lemon Ricotta Pancakes.

PIC 1 FInal Pancakes

Lemon Ricotta Pancakes 

Whisk the following ingredients together:

3/4 cups all purpose flour

3/4 cups Red Fife flour (which will add a lovely nuttiness or use all purpose)

2 tsp baking powder

Zest of 1 lemon

1 tsp sea salt

1 1/4 cups milk

1 egg

2-3 tsp lemon juice

Then fold in 1 cup of homemade ricotta.  Cook pancakes on a medium low heat (you can keep them warm in the oven set at 200).  Serve with blueberries and warm maple syrup.

**Ally has also told me that these freeze really well for make-ahead, instant breakfasts.

RICOTTA

Originating in Italy, the name “ricotta” comes from the Latin recocta or “recooked,” reflecting the fact that the whey is reheated after being “cooked” once already when separating the curds and whey.Ricotta can be made from sheep’s, cow’s, goat’s or water buffalo’s milk and is a fresh, loose cheese with a mild flavour that can sometimes have a slightly granular texture (ripened and smoked varieties also exist). Some ricottas are made with skim or whole milk, which increases fat content and makes them more moist and creamy.  (Like Ally’s recipe)

4 Comments

Filed under All Recipes, Cheese/Cheese Related, Uncategorized

Making Saag Paneer with guest hostess Johanne Durocher

Saag Paneer for dinner-YUM!

I am absolutely thrilled to have my friend Johanne do a guest blog for me!  She has so much going on and yet made time for Cheese and Toast.  Her bio and pic (including a pic of donuts) is here and her blog Fashion in Motion is a fave–not only because of the fabulous content but I love Johanne’s witty and fun writing style.  You shall see as you read from this point on…..  ENJOY, SR.

As a gal who likes to improvise in the dressing room and in the kitchen, following a recipe to the letter is an exercise in restraint. I can’t resist substitutions, additions, modifications. I’ll use a silicone spatula instead of a wooden spoon. I’m such a rebel. Cue the music: I did it my way.

Perhaps that’s why I’ve always enjoyed cooking Indian food: it’s so flexible to adding more of this, less of that, turn up the heat or throw in an extra veg. But every now and again and I take on a new recipe and force-feed myself a little discipline. I do my best to follow it to the letter and not dispute salting the water or measuring only one teaspoon of vanilla.

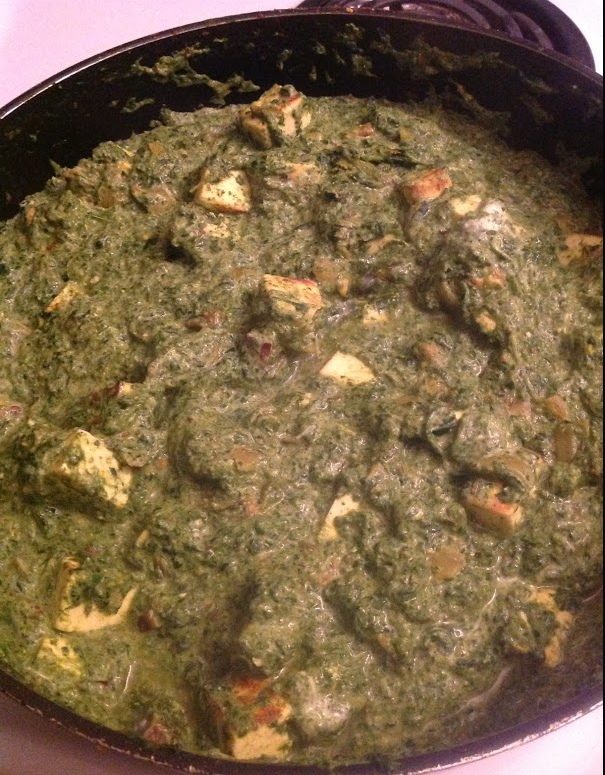
And so it was with this in mind that I rolled up my sleeves and made Saag Paneer. Most people look shocked and a little scared when I tell them I made Saag Paneer. It is fitting that we reveal the mystery of the saag right here right now.

I followed the recipe here at Active For Life and it boasts a healthy take on the Indian classic. Having made Indian dishes before, I thought, piece of cake. It is very easy- but not necessarily a project I recommend undertaking on a weeknight unless you’re up to eating at 9pm. It will be an event: so pour yourself a drink and start washing your spinach.

I set a very large pot of salted water to boil and while that was heating up, I washed and dried just over two pounds of fresh spinach. That in itself took a long time and when I make this recipe again, I may just buy it pre-washed.

Fresh Spinach

I prepared just over two pounds of fresh spinach that I chopped into 3-inch long segments

Before blanching the spinach, I coarsely chopped it in half or thirds depending on the length of the leaves. I figured that this way when I would blend them there wouldn’t be a chance of having long strings of spinach filaments- imagined or real, the anticipation caused a coarse chop (see- I just can’t help myself throw in extra steps.)

Okay, when the water is at a full boil you drop your spinach in it, stir to get it all wet and then you wait and watch with the lid off (helps tremendously).

Spinach in Water

Blanching spinach is easy- just let the water come back to a boil and you’re done

When the water begins to boil again, strain the spinach and discard the water. In my case, I was hesitating about blanching it all at once because I had so much spinach and perhaps had not chosen a large enough pot, so I blanched in batches. To do this, just delicately scoop out the blanched spinach from the water and let the water come back to a roaring boil before throwing in the next batch. Worked really well for me.

Blanched spinach

The goal of blanching is to soften the spinach, not kill it to mush

After that bring in the high-powered machine: blend the spinach in a food processor at high speed. It won’t be super smooth so you’ll want to add water at the rate of one tablespoon at a time, then blend again, then add water until it’s looking smooth to you. It won’t be like a creamy-smooth, but it should be well-blended and the spinach particles quite small. No chunks, no filaments.

Food Processor

I was using my mini-food processor and had to blend my spinach in batches. See? Anything is possible

After that comes the fun stuff: on medium heat, melt 2 tbsp of butter in a large pan with high sides. Add ¾ tsp of cumin seeds and cook until slightly browned and fragrant, stirring occasionally. Careful not to let these babies burn. Add 1 diced cooking onion and sauté until golden, roughly 10 minutes. Stir in 3 cloves of grated garlic and 2 tea spoons of grated ginger root. Cook for one minute.

Onion and Cumin

By this time it will smell so good in your house you’ll be thinking you can do this

When the onions are nice and golden, stir in ¼ cup of cilantro finely chopped, ½ tsp each of salt, ground coriander and turmeric. Stir in ¼ tsp of cinnamon and cook 30 seconds until fragrant. Add ½ cup of fresh chopped tomatoes and cook until they reduce and break down, roughly 5 minutes.

Paneer in Pan

I made the execute chef decision to pan-fry the paneer cubes at this step in the game

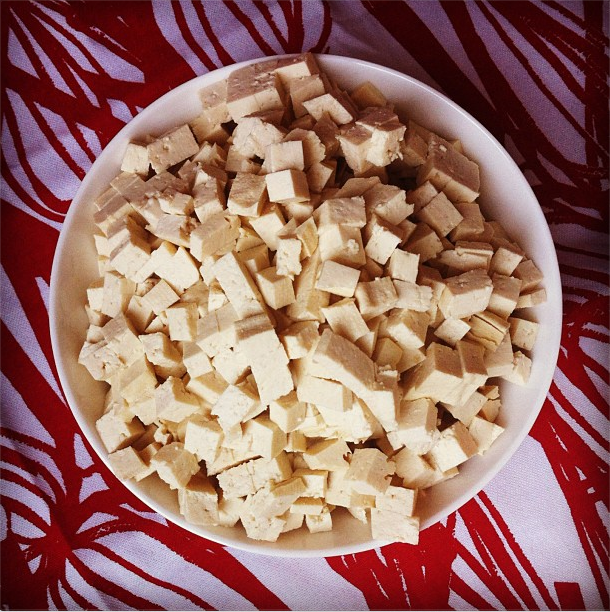
Set aside the tomato mixture in a bowl and return the frying pan to the stove, adding one teaspoon of oil and set that to medium heat. Dice 1 package of paneer into bite-sized cubes and add that to your hot pan. I added two cloves of grated garlic to them and flipped the cubes until golden crispy on two or more sides and then pulled those aside. This paneer-frying is a deviation that is perfectly acceptable (weeks later I discussed this with chef Vikram Vij who said it’s okay, but you can also just add your paneer later as the recipe instructs and that way it will be more melt-y, less-cube-y in texture. Your choice.).

Golden Paneer

Mmm paneer- a pressed cheese much like cottage cheese brick and commonly used in Indian cooking. I didn’t make the paneer and you don’t have to, either; it’s found at most large supermarkets.

I returned my pan to the heat and picked up where I left off: in it went the tomato mixture which I brought back to medium heat while stirring, and then added the reserved spinach. Cook for 3 minutes.

Spinach and Tomato

See me using a wooden spoon! I’m not breaking all the recipe rules

After that you should be looking at it and asking yourself if the mixture is saucy. If too thick, add water a few tablespoons at a time and stir. Stir in 1/3 cup of plain yogurt (I used fat-free Greek yogurt and threw in a little extra), the paneer cubes, and 2 tsp of lemon juice.

Yogurt Paneer

Watching this coming together is like waiting for the finale to a figure skating routine and you will get a quad

Bring to a simmer, then cover and cook for 5 minutes. Uncover, cut the heat, stir and admire your work.

FInal Saag Paneer

Ta-da! It will be magic and even the international judges will give you full points

Serve with rice or naan bread, or in my case, eat it straight up with a side of Panch Churan chutney (see top photo).

Thoughts on leftovers….

For me it was the best on the night-of, the leftovers were delicious but the creaminess never matched the same bliss as when the sauce came out of the pan. Chef Vikram Vij told me that flavours will intensify over time, too.

Come over here to see the full instructions to make this Saag Paneer and feel like an Indian figure-skating sensation.

6 Comments

Filed under All Recipes, Blogs with cooking tips, Cheese/Cheese Related, Uncategorized

Hot and Sour Soup: The cure for what ails you (like that dumb flu)

MMMM MMMM, hot, sour and just right.

MMMM MMMM, Hot, Sour and just right.

It finally hit me.  The flu–yes that one.  Where you think you might be able to get out of bed while lying very still (in bed) but then put two feet on the floor, feel dizzy and realize, “nope, not getting out”.  I drank a lot of tea with lemon and nibbled buttered toast and then pulled out the big guns.  Hot and Sour Soup.  A step beyond comfy chicken soup, like the Buckley’s of cough syrup–except it tastes great.  And it works.

PIC 4 broth hot and sour

Broth for the Hot and Sour Soup–involves chicken stock, white wine vinegar and cayenne

I’d discovered the recipe in October issue of Saveur, “150 Classic Recipes” which I have a subscription for on my iPad.  The whole issue is amazing and inspiring and mouth-watering but I had never made Hot and Sour Soup and what a great skill to have I though!  The recipe is from the December 2005 issue and the little blurb I missed the first time around explained that, “Other cultures soothe their sick with bland milk toast and chicken broth but the Chinese kick their sick in the pants.  This soup doesn’t just warm you, it burns through you and brings you back to life.”- Mei Chin

Back to Life is just what this self-diagnosing patient needed.

PIC 3 marinating pork

So I began with marinating the pork.  Cut 4 oz pork tenderloin in 1/4″ cubes and toss with 1 tbsp soy sauce, 1 tbsp brandy and 1 tsp corn starch. I didn’t have brandy so used Madeira.  Let it sit 15 minutes at room temperature.

Meanwhile make the broth-in a large pot whisk together 8 cups chicken stock, 3 tbsp soy sauce, 3 tbsp white wine vinegar, 3 tbsp corn starch, 1 tsp ground white pepper, 1 tsp kosher salt and 1/2 tsp cayenne.  (I used a pinch of red pepper flakes).  Bring that to a boil over medium-high and add the pork.  Reduce the heat to medium low and cook until the soup thickens–about 30 minutes.  Give it an occasional stir.

PIC 5 Hot and sour soup tofu

Meanwhile you can cut 12 oz of firm tofu (drain and press lightly) into 1/4″ cubes.  Do the same with a potato to get about 1/4 cup cubed.

Pic 6 Hot and sour soup shiitakes

Take 6 shiitake mushrooms and cut them into thin strips.

Now add your tofu, potato and mushrooms to the pot once the soup is thickened and cook until the potatoes are tender.

PIC 7 egg

Now for the best part of the job!  Lightly beat 1 egg in a bowl and drizzle it into the simmering soup in a thin steady stream–egg strands will start to float to the surface and you will feel that YES, you see it all coming together.  Now stir in 1 tsp toasted sesame oil.

**I add about a teaspoon of Mirin at the very end, just rounds out the flavour for me with a hint of sweetness.

PIC 2 FInal Hot and Sour Soup

Ladle into a bowl and garnish with cilantro.  Eat in bed for lunch and again for dinner.  And of course, you should not be making this yourself, you are far too weak.  Your spouse, partner, mailman or cat is more than capable of following these simple directions.

For the recipe on-line at Saveur click on HOT AND SOUR SOUP RECIPE.

11 Comments

Filed under All Recipes, Cookbooks, Magazines (+recipes from)

Elegant and scrumptious- Brown Sugar Shortbread (what else r u doing Boxing Day?)

Shortbread Brown Sugar

In case you ran out of Christmas cookies before Christmas (what?  it was only me?) you will have a perfect reason for making more.  I took the opportunity to make–for the first time– a family recipe passed on to me by my friend Marilyn.  Her short bread (and her mincemeat tarts) are now almost as highly anticipated as my own mom’s cookies (almost! I said almost mam!)

Shortbread Final 2

Marilyn’s daughter Emma, also a good friend has posted the recipe on her very fun blog Strolling the City in Heels, where you can learn a little more about their family tradition.  I am posting the step-by-step picture version for my friends who say they “don’t bake”  to give them reason to take a crack at bringing joy to their cookie jar. (Get a cookie jar people).  And BTW while on Emma’s blog, also check out Marilyn’s Tourtiere recipe.

butter shortbread

You only need three ingredients starting with 1 pd salted butter at room temperature.  (I only had unsalted butter so added 1/4 tsp salt per stick of butter for a total of 1 teaspoon salt)

brown sugar

Brown sugar, packed 3/4 cup.

Screen Shot 2012-12-25 at 12.24.26 PM

And then the recipe says, “4 heaping cups flour”.  Which makes perfect sense to anyone who has made the recipe a million times.  But I wasn’t sure if it meant scoop the flour (which packs it more) or fill the cup with a spoon.  So I filled the cup with a scoop and let it heap a bit.

Then I weighed the flour for future reference.  (I used 650g of all-purpose flour for anyone who has a scale and is anal like me.)

cream sugar

Step 1: Cream the butter and sugar.

Shortbread dough

Step 2: Add the flour and combine well. I started with a wooden spoon but finished (as the recipe says) with my hands.  Be really careful to get all the flour integrated well (really get your hands in there!) with the butter/sugar so there are not white streaks in the dough–or (as happened to me) when you roll it out parts of the dough will not stick together.

rolled dough

Step 3: The recipe then says you pat the dough out to about 1/2 inch thick.  Use the base of your hand to flatten for a smooth surface (if you use your finger tips the dough will have many indents).  I finished off with a quick pass with the rolling-pin  (cheater–I know!) and rolled in a couple batches.

Also–my dough was about 3/4 thick which in my mind’s memory is the thickness of Marilyn’s cookies.

Shortbread cookie cutters

Step 4: Now  have a grand old-time cutting out your cookies.   All my cookie cutters stuck to Marilyn’s original size (or slightly under) about 2-3 inches.

uncooked short bread

Place on parchment lined cookie sheets. Prick the uncooked shapes with a fork and sprinkle with white or coloured sugar.

Cooling shortbread

Step 5: Preheat the oven to 300.

Bake for 20 minutes or til golden (says the recipe).  But mine baked for 40 minutes until they were golden-which seems strange–maybe just my oven?  But they turned out delicious and not burnt at all.  So, check them at 20 minutes and add 5 minutes at a time.

COOL COMPLETELY and devour.

Short bread on plate

The Original Recipe (my notes are above)

NANA’S SHORTBREAD

4 heaping cups all purpose flour

1 pound salted butter, softened to room temperature

3/4 cup packed brown sugar

Instructions

Cream butter and sugar together.  Add flour, mixing in thoroughly with your hands.

Pat dough out to about 1/2” thick. Cut cookies with cutters. Prick each cookie with a fork and dust with coloured sugar.

Bake at 300 degrees F for about 20 minutes or until golden brown.  Cool thoroughly on racks

PS Just imagine the cookie cutter potential—hearts for Valentines Day, Beer mugs for St. Patricks Day, Dollar Signs for when the US falls off the Fiscal Cliff…..

2 Comments

Filed under All Recipes, Uncategorized

Find me on Foodnetwork.ca with some kid-friendly cooking ideas

The blue shape is a train. Really. Squint.

Happy Father’s Day to all ye dads.  And to my dad and to my son’s dad.  (You know who you are.)

I jut wanted to let you all know that I’ve started blogging weekly for The Food Network, so every Friday I’m posting a recipe or something to do with cooking that is easy for kids to participate but also that helps them start to learn about food, cooking and kitchen skills.

Today’s post is sugar cookies for Father’s Day.  Just the basic variety (cars, planes, trains).  If you want to see kick ass effort check out this link to a cookie “remote control”.

I know! Crazy. Someone loves their husband more than I love mine. (from somewhatsimple.com)

I encourage Felix to cook with me, and before I teach him about organic or local or grass-fed I really just want him to see meals come together.  A pizza made from scratch.  Stuff like that.

And I do not mean to be preachy (we are having friends over tonight and I will be ordering pizza and just making a quick salad to go with–or actually asking my friends to bring that–better idea!)  but  sometimes a simple lentil salad with lemon dressing (canned lentils) can go a long way when paired with fast meals like grilled cheese-or pasta with garlic and butter.

And Does Felix eat lentil salad?  Sometimes a fair bit, sometimes none but usually something in between.  But, he knows how to make it!  Though honestly, my cat could make it (it’s slightly more awkward whisking with paws we’ve found–and we keep electrical gadgets out of her reach).

You’ll see a new sidebar on the right side of the blog called Cooking With Kids and I will add links there as the blogs accumulate.  Thanks for checking it out.

Have a fantastic weekend.    S.

See the train shape now? What about the car? Maybe move back from your screen…

1 Comment

Filed under All Recipes, Blogs with cooking tips, Uncategorized

Foodie meet Library

Momofuko has been well worn

I would rather tell you how many shoes I have in my closet than how many cookbooks I own.  And actually, it’s not about how many I own, but how many I use regularly.

And when I say use, I obviously mean for recipes (my current 4-5 favourites rotate in and out of the kitchen) but also the books that I love to look at, that remind me of somewhere I travelled or just tell a good story or the books that I WILL use when I finally get around to doing some pit cooking in my backyard.

Pit Cooking (www.primitiveways.com)

But, if you love and use cookbooks you also know that, like an uncomfortable shoe, there are disappointments.  Recipes that never work or are too vague, purchases that were spontaneous “yes! I WILL be an expert confectioner!” and the trendy stuff  (how many Jamie Oliver cookbooks does one house need?).

I also do not mean to imply you have to cook out of a cookbook to enjoy it.  Not at all.  But, at least for myself, now that I know what I like I have a better idea what is a worthwhile investment of money and shelf space. And it forces me to look and flip through and appreciate the book right away as I will have to return it sooner or later.

THUS I INTRODUCE FELLOW COOKBOOK ADDICTS TO THE LIBRARY.

I myself forgot about the library for many years.  With amazon and ebooks downloading in a flash, it seemed troublesome to go somewhere to physically check out a book.  In fact, it did not even occur to me that the library had modernized since I was 12 and is now (gasp) on-line.

I got myself a card and now I just log on, put a hold on the cookbooks or books I want and I am sent an alert when it arrives at the branch of my choice.

Sometimes it takes a day or two and sometimes a few weeks (but how exciting when the email arrives saying Happy Day! The Art of Living According to Joe Beef is mine!! ).

Test Drive Potential Cookbooks

Now with cookbooks I borrow them.  I read them and maybe try a recipe or two.  And generally have a clear sense of whether I need this particular book at my fingertips at a moment’s notice.

And I feel a little more satisfied when finally making a purchase.  Yes, I took the book for a test drive.  It performed as I’d hoped.

And while you’re at the great place called The Library you can also get books such as this:

Or, something beautiful and simple such as this:

And all in all, the place just smells like books and pages and everything is organized and you can hide in a corner where no one knows you reading the latest issue of The New Yorker.

Or just looking in fashion magazines for shoes to buy.

10 Comments

Filed under Blogs with cooking tips, Cookbooks, Magazines (+recipes from), Ruminations on the Edible